
45. BMP280 data logger
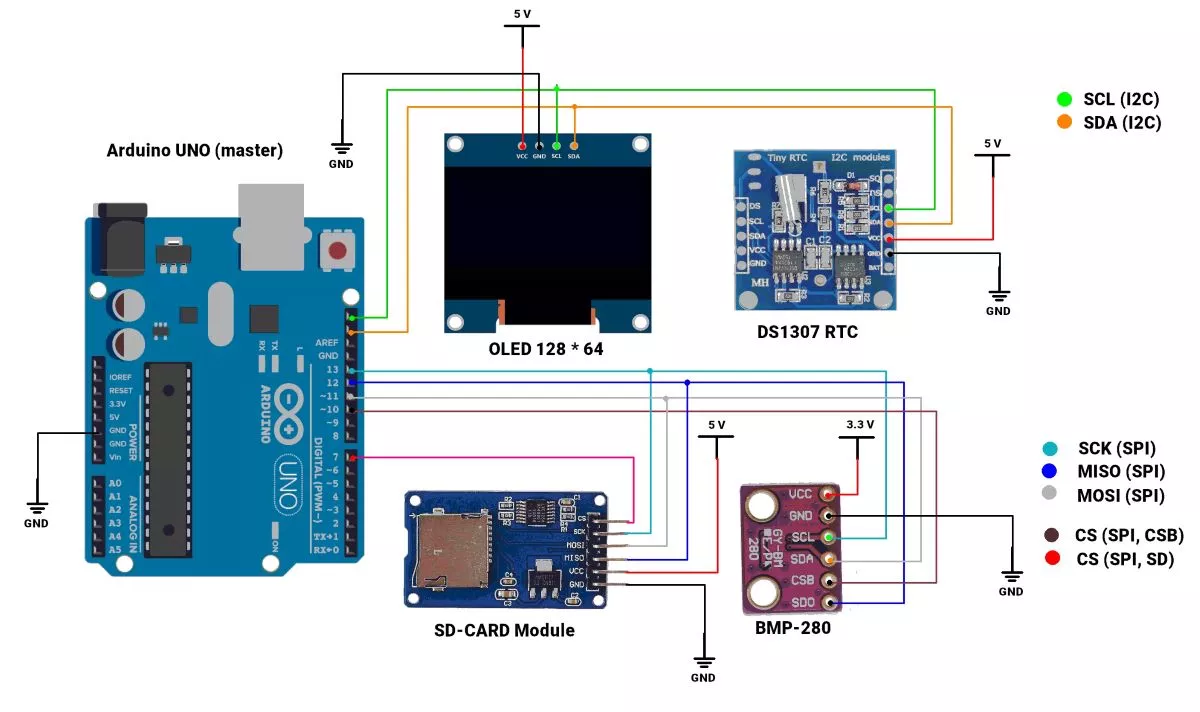
In this task, we will be using the following components
- Master
- Arduino UNO.
- SPI-based slaves
- SD card module (5v).
- BMP280 sensor module (1.8v - 5.5v).
- I2C-based slaves
- DS1307 RTC module (5v).
- SSD1306 128x64 OLED display (5v).
For detailed information on SD card modules, you can refer to this informative blog: MicroSD card interfacing with Arduino.
Since two devices operate over I2C and two operate over SPI, there are several considerations to keep in mind
- All devices must share a common ground (GND).
- Separate Chip Select (CS) pins should be assigned for the SD card and the BMP280.
- How much power can the Arduino UNO supply? And how much power does this entire setup consume? These questions will be addressed in the power consumption analysis at the end of the solution.
Connection Diagram
Set RTC time & date
- The new RTC module may have an inaccurate date and time by default.
- Use the sketch "setTimeAndDate. ino" (from the Bonezegei_DS1307 library examples) to set the RTC date and time initially.
- Refer to the image below.

Code
#include <Wire.h>
#include <SPI.h>
#include <SD.h>

// below 3 libraries are needed to be installed
#include <Adafruit_BMP280.h>   // BMP280 lib
#include <Bonezegei_DS1307.h>  // RTC lib
#include "SSD1306Ascii.h"      // oled lib

// below 1 library is already bundled with SSD1306 Ascii library
#include "SSD1306AsciiWire.h"

/* SPI pins for BMP280 */
#define BMP_CS (10)

/* CS pin for SD card */
#define SD_CS 7

/* OLED dimensions */
#define OLED_WIDTH 128
#define OLED_HEIGHT 64
#define I2C_ADDRESS 0x3C  // OLED address
#define RST_PIN -1        // Define if required

SSD1306AsciiWire oled;        // declare object for OLED
Adafruit_BMP280 bmp(BMP_CS);  // declare object for BMP280
Bonezegei_DS1307 rtc(0x68);   // declare object for rtc module DS1307


/* datafile used to log data in SD card */
File dataFile;

/* storing date and time data */
char dateStr[] = "2025-00-00";
char timeStr[] = "00 : 00 : 00";
char timeStrFile[] = "00:00:00";


void setup() {
  Serial.begin(115200);

  /* Initializing BMP-280 sensor contniously */
  Serial.print(F("Initializing BMP280 sensor"));
  while (!bmp.begin()) {
    Serial.print(F("."));
    delay(100);
  }
  delay(3000);        // delay for BMP sensor to connect
  Serial.println();

  //   /* Initializing BMP-280 sensor once */
  // bmp.begin();
  // Serial.println("BMP sensor initialized!");

  /* Default settings from datasheet. */
  bmp.setSampling(Adafruit_BMP280::MODE_NORMAL,     /* Operating Mode.*/
                  Adafruit_BMP280::SAMPLING_X2,     /* Temp. oversampling */
                  Adafruit_BMP280::SAMPLING_X16,    /* Pressure oversampling */
                  Adafruit_BMP280::FILTER_X16,      /* Filtering. */
                  Adafruit_BMP280::STANDBY_MS_500); /* Standby time. */

  /* Init SD card */
  Serial.print(F("Initializing SD card module"));
  while (!SD.begin(SD_CS)) {
    Serial.print(F("."));
    delay(100);
  }
  Serial.println();

  /* Open data file */
  Serial.print(F("Opening SD card file"));
  do {
    dataFile = SD.open("data.csv", FILE_WRITE);
    Serial.print(".");
  } while (!dataFile);
  Serial.println();

  if (dataFile && dataFile.size() == 0) {
    dataFile.println(F("Temperature,Pressure,Altitude,Date,Time"));  // write heading to 5 colums in csv file
    dataFile.close();
  }

  /* Initialize RTC module */
  Serial.print(F("Initializing RTC module"));
  while (!rtc.begin()) {
    Serial.print(".");
    delay(100);
  }
  Serial.println();
  rtc.setFormat(24);

  // Check if the OLED display is connected
  Serial.print("OLED display scanning...");
  Wire.beginTransmission(I2C_ADDRESS);  // Start I2C communication with OLED
  while (Wire.endTransmission()) {      // Check if the OLED responds
    Serial.print(".");
    delay(100);
  }
  Serial.println(" ");
  Serial.println("OLED display found");
  delay(100);

/* Initialize OLED */
#if RST_PIN >= 0
  oled.begin(&Adafruit128x64, I2C_ADDRESS, RST_PIN);
#else
  oled.begin(&Adafruit128x64, I2C_ADDRESS);
#endif

  oled.setFont(TimesNewRoman13);  // set OLED font
  oled.clear();                   // clear OLED
  oled.set1X();
}

void loop() {
  float temprature = bmp.readTemperature();
  float pressure = bmp.readPressure();
  float altitide = bmp.readAltitude();

  if (rtc.getTime()) {                                                                         // read time from RTC
    sprintf(dateStr, "%02d-%02d-20%02d", rtc.getDate(), rtc.getMonth(), rtc.getYear());        // date string
    sprintf(timeStr, "%02d : %02d : %02d", rtc.getHour(), rtc.getMinute(), rtc.getSeconds());  // time string
    sprintf(timeStrFile, "%02d:%02d:%02d", rtc.getHour(), rtc.getMinute(), rtc.getSeconds());  // time string that will be stored in .csv file
  } else {
    Serial.println(F("RTC failure!"));
  }

  /* Print data on Serial monitor */
  Serial.println((String)dateStr + "   " + timeStrFile);  // print date and time
  Serial.println((String) "Temperature = \t\t" + temprature + " °C");
  Serial.println((String) "Pressure = \t\t" + pressure + " Pa");
  Serial.println((String) "Approx altitude = \t" + altitide + " m\n");

  /* Open CSV file to write data */
  Serial.print(F("opening data.csv file."));
  do {
    dataFile = SD.open("data.csv", FILE_WRITE);
    Serial.print(".");
  } while (!dataFile);
  Serial.println();

  if (dataFile) {
    dataFile.println((String)temprature + "," + pressure + "," + altitide + "," + dateStr + "," + timeStrFile);  // write data in 5 colums. "," seprates data into colums.
    dataFile.close();
  }

  /* Print data on OLED */
  oled.setCursor(0, 0);
  oled.println((String)dateStr + "      " + timeStr + "        ");  // empty space "   " at end is for clearing empty space line
  // oled.println((String) "Temp:  " + temprature + " " + (char)128 + "C" + "                   ");
  oled.println((String) "Temp:  " + temprature + " `C" + "                   ");
  oled.println((String) "Press: " + pressure + " Pa" + "                   ");
  oled.println((String) "Alt:   " + altitide + " m" + "                   ");

  // wait for 1000 ms
  while (millis() % 1000);
}
Code Explanation
Pre Installed Libraries
Wire.h: For I2C communication.SPI.h:For SPI communication.SD.h: For handling SD card functions.
Libraries to Install
Adafruit_BMP280.h: Manages the BMP280 sensor.Bonezegei_DS1307.h: Used for the DS1307 RTC module.SSD1306Ascii.h: Controls the OLED display.
These libraries can be downloaded from the Arduino Library Manager.
Note: There’s no need to install SSD1306AsciiWire.h separately since it's already bundled with SSD1306Ascii
BMP280 Sensor Configuration
bmp.setSampling: Configures the operating mode and settings for the BMP280 sensor.Adafruit_BMP280::SAMPLING_X2: Sets temperature oversampling to 2x, balancing accuracy and performance.Adafruit_BMP280::SAMPLING_X16: Sets pressure oversampling to 16x, for highly accurate pressure readings.Adafruit_BMP280::FILTER_X16: Configures a 16x filter to reduce sensor noise in the data.Adafruit_BMP280::STANDBY_MS_500: Sets the standby period to 500ms, controlling power-saving between measurements.
Reading BMP280 Data
- Data from the BMP280 sensor is read using the methods
bmp.readTemperature(),bmp.readPressure(), andbmp.readAltitude(). These return float values for temperature (in °C), pressure (in Pa), and altitude (in meters) based on atmospheric pressure.
Reading RTC Data
- The DS1307 RTC provides date and time through methods like
rtc.getDate(),rtc.getMonth(),rtc.getYear(),rtc.getHour(),rtc.getMinute(), andrtc.getSeconds(). The data is formatted into strings using sprintf for displaying and logging.
Adding CSV Header
- The line if
(dataFile && dataFile.size() == 0)checks if the file was just created (i.e., it's empty). If the file is empty, the code adds a header ("Temperature,Pressure,Altitude,Date,Time") to the CSV file, ensuring the columns are labeled for future data entries. - Each value is separated by a comma (,) i.e. in multiple columns.
Writing Data to CSV File
- Data is written to the CSV file using dataFile.
- The line
dataFile.println((String)temprature + "," + pressure + "," + altitide + "," + dateStr + "," + timeStr);creates a comma-separated line of data that includes temperature, pressure, altitude, date, and time. - Each value is separated by a comma, which ensures that the data is neatly arranged in columns when opened in a spreadsheet program.
Displaying on OLED:
The OLED is updated by setting the cursor position using oled.setCursor(), then displaying the data using oled.println(). Temperature, pressure, and altitude are displayed with labels, while spaces are used to clear any extra characters from previous data on the OLED display.
Note

- The OLED library supports only 127 characters.
- An extra degree symbol (character 128) is included inside the library, as seen printed on OLED.
- This symbol will not work with the default library. Thus, this line of code is commented & ` symbol is used instead of the degree.
Code Snippet
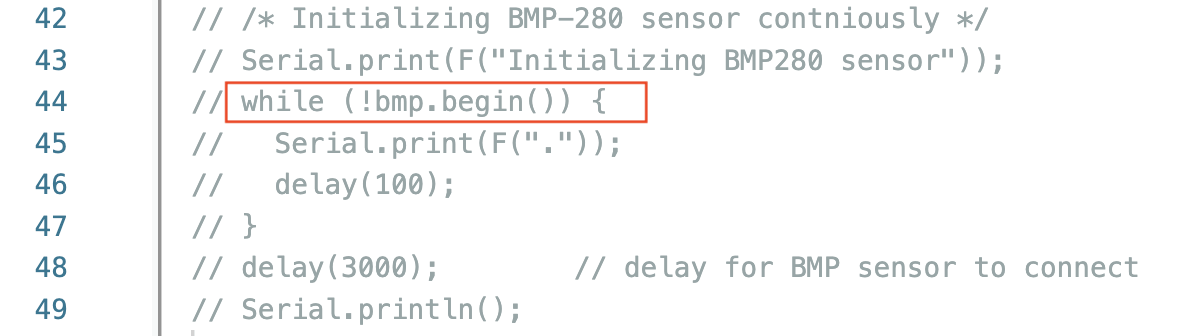
- The code continuously calls bmp.begin() until it returns true.
- Sometimes bmp.begin() fails and keeps returning false.
- To avoid this, the lines are commented out.
- If there's an issue with BMP sensor initialization, uncomment these lines.
Output
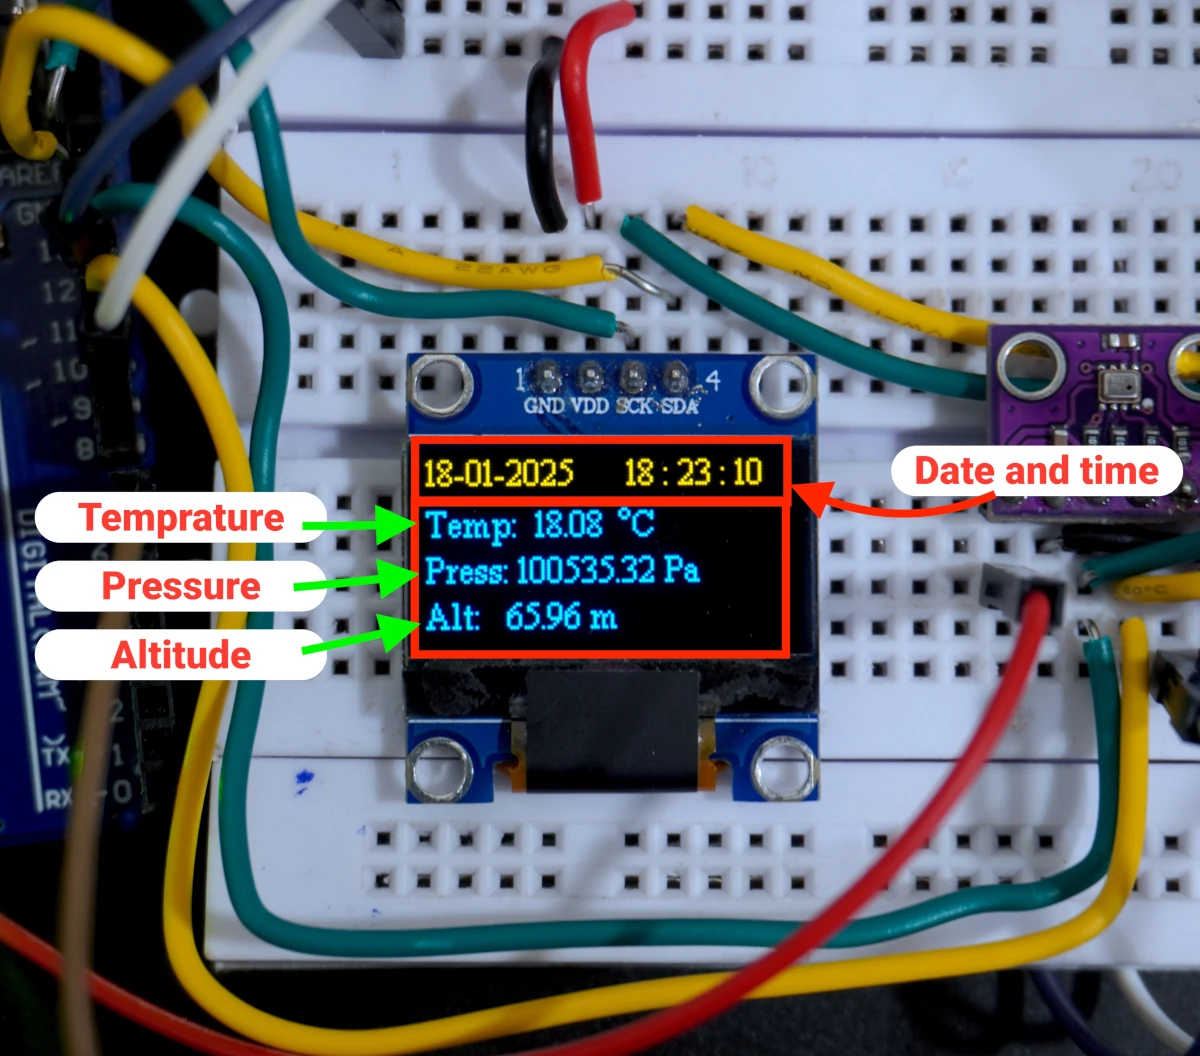
OLED displayed data
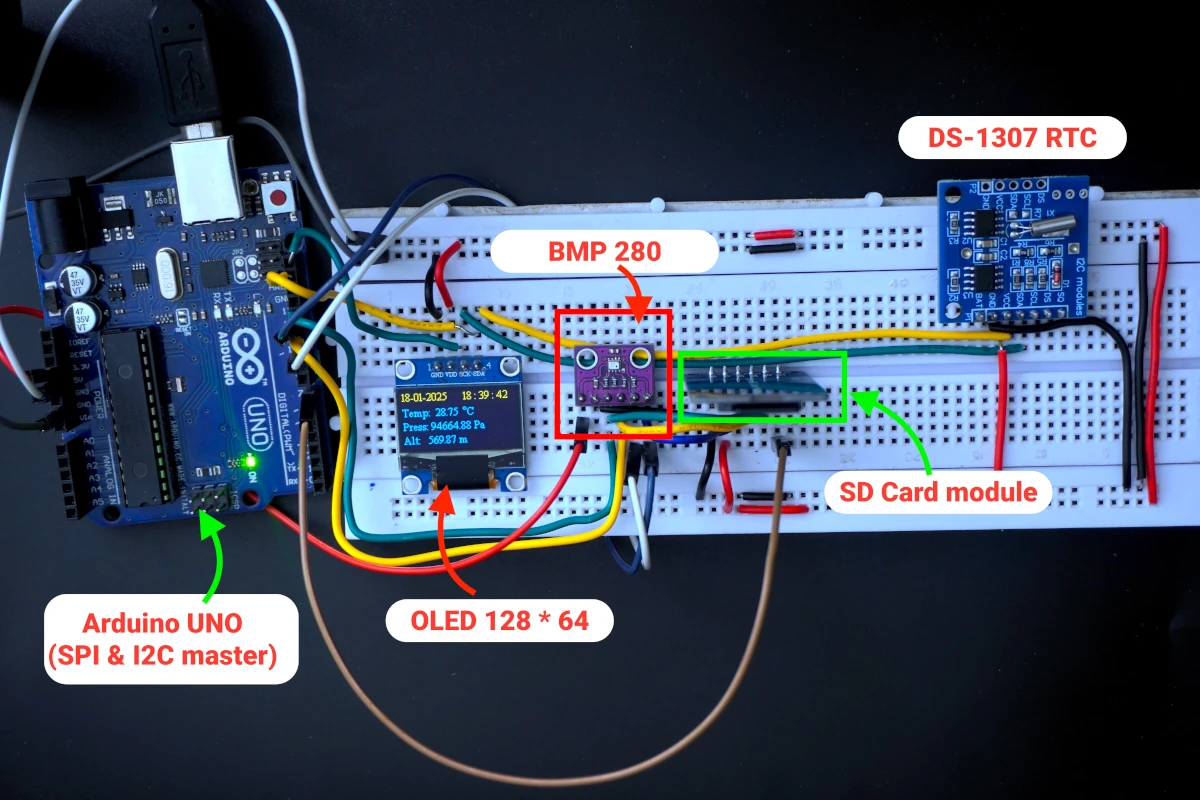
Output Setup Photo
Output Video
How much power can Arduino UNO supply via 5V pin?
Referring to the provided datasheets and schematics
The input voltage supplied to the Arduino Uno passes through a 5V voltage regulator. According to the schematic, the voltage regulator used on most genuine Arduino Uno boards is the MC33269, which supports an output current of up to 800mA.

However, many Arduino Uno boards, particularly clones, often use the AMS1117-5 regulator instead, which has a current output range between 900mA and 1500mA.

The 5V pin on the Arduino Uno can supply a current of at least 800mA. When powering the Arduino via USB, the current provided is typically around 500mA, unless connected to a USB 3.0 port, which can output up to 900mA. From the available 500mA, the Arduino’s ATmega328p microcontroller consumes approximately 50 - 70mA when running without additional peripherals.
As a result, the 5V pin on the Arduino Uno can safely provide approximately 400mA of current when powered via USB, after accounting for the microcontroller’s consumption.
How much is our Setup consuming?
Based on the datasheets provided below:
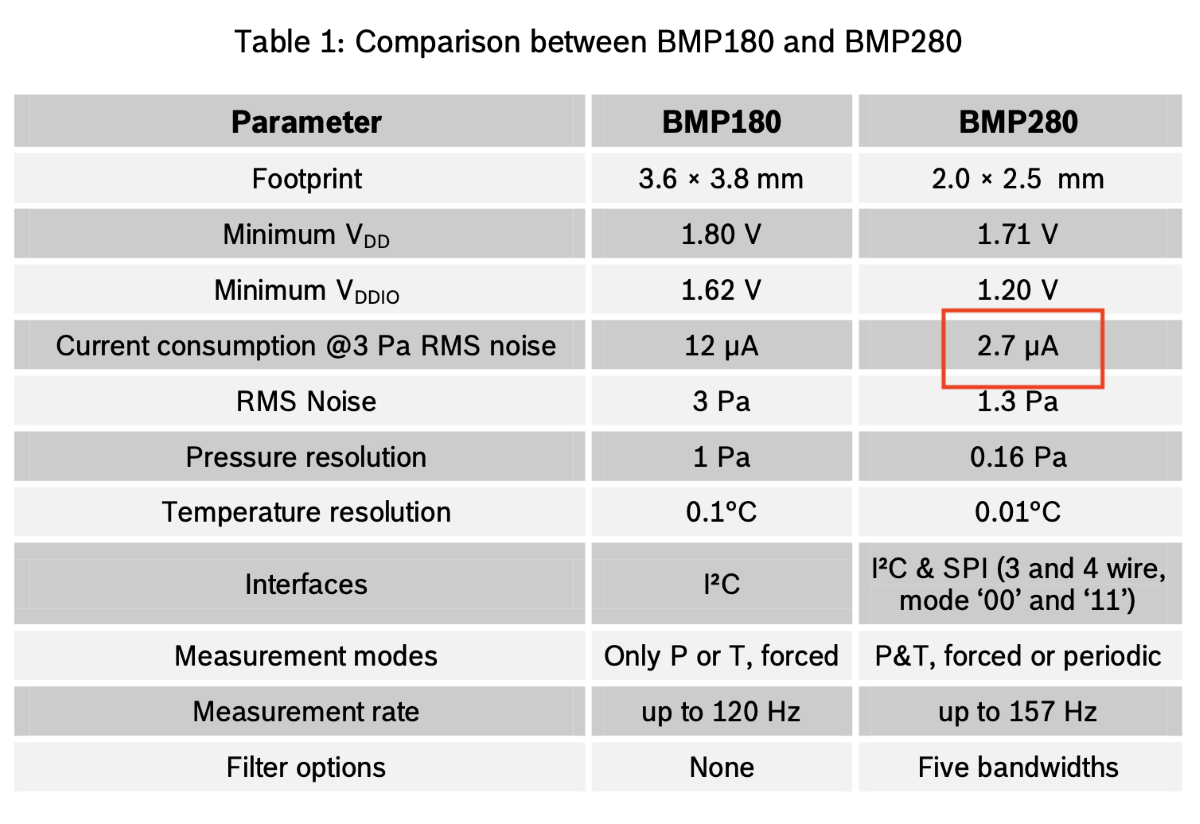
BMP280: As per the BMP280 datasheet, the sensor consumes 2.7 µA, which is considered negligible.
RTC Module (DS1307): According to the DS1307 RTC module datasheet, it draws 1.5 mA of current.

There is no official datasheet for the SD card module, but multiple online sources suggest a maximum current consumption of 200 mA.
Similarly, there is no official datasheet for the OLED display. However, based on various references, the OLED display is estimated to consume up to 147 mA.
Summing these values, the total estimated current draw is approximately 348.5 mA, which is within safe operating limits.